Wednesday, August 27, 2014

Set MTU Size In LAN Network

Windows 2008 Server SP2 Standard
Windows XP Client SP3

The Default MTU size of different media can be seen here .
For LAN Ethernet Default is 1500.

To check MTU size from a client machine to LAN Server, execute following command in Command Prompt.

ping IPAddress -f -l MTUSize. (l is small L)

For Example -  ping 172.16.100.205 -f -l 1500

If Packet needs to be fragmented but DF set. shows in command prompt, you should set MTU size by lowering the packet size.


Repeat the above process by entering lower MTU size until you do not see Packet Fragmented message. Repeat same process by adding 1 in MTU like 1272+1 = 1273. If you see Packet Fragmented message, then 1272 is correct MTU & not 1273.


After determining correct MTU size for Server, log in to Server by Administrator Account.
In Command Prompt execute -

netsh interface ipv4 show interfaces


 Execute following command in cmd for setting MTU size -

netsh interface ipv4 set subinterface 11 mtu=1272 store=persistent


Monday, August 25, 2014

Enter Only Numeric In ADF InputText In JDeveloper 11g

Oracle JDeveloper 11.1.2.3
ADF Faces Rich Component

To enter only numbers/numeric value in ADF InputText,
<af:validateRegExp/> can be used from Operations node in Component Palette.

 <af:inputText value="#{bindings.EmployeeNo1.inputValue}" label="#{bindings.EmployeeNo1.hints.label}"  
                  required="#{bindings.EmployeeNo1.hints.mandatory}"  
                  columns="#{bindings.EmployeeNo1.hints.displayWidth}"  
                  maximumLength="#{bindings.EmployeeNo1.hints.precision}"  
                  shortDesc="#{bindings.EmployeeNo1.hints.tooltip}" id="it18"  
                  autoSubmit="true"  
                  valueChangeListener="#{backingBeanScope.book.employeeDetails}">  
             <f:validator binding="#{bindings.EmployeeNo1.validator}"/>  
   <af:validateRegExp pattern="[0-9]{1,10}" messageDetailNoMatch="Enter Only Numbers"/>  
 </af:inputText>  

Sunday, August 24, 2014

Dynamically Set Value In ADF InputText By Runtime JavaScript In JDeveloper 11g

Oracle JDeveloper 11.1.2.3
ADF Faces Rich Component
ADF Business Components

Sometime requirement is to set the value in Text Component by JavaScript.
We can set the value in Adf InputText dynamically by Server Side JavaScript.

Sample is based on Oracle HR Schema & can be downloaded from here.

In the sample, after pressing CreateInsert button a blank form is displayed for 
New Record Entry.


After entering a unique DepartmentId (25)DepartmentName field is automatically
populated with TestDept value.


Saturday, August 23, 2014

Publish Windows Server Drive To FTP Service To Access From FTP Client FileZilla Or Browser

Windows Server Standard 2008 SP2
FileZilla Client
IIS 6.0

Sometimes we need to access our Local/Intranet Server Drives by FTP Client for downloading or uploading files or folders. We can publish our Drives as Virtual Directory on FTP Service to access from FTP client or Browser.

FTP services in Windows do require IIS to be installed on the host machine before FTP can be installed and configured. 


1. Click Start - Settings - Control Panel - Administrative Tools - Server Manager


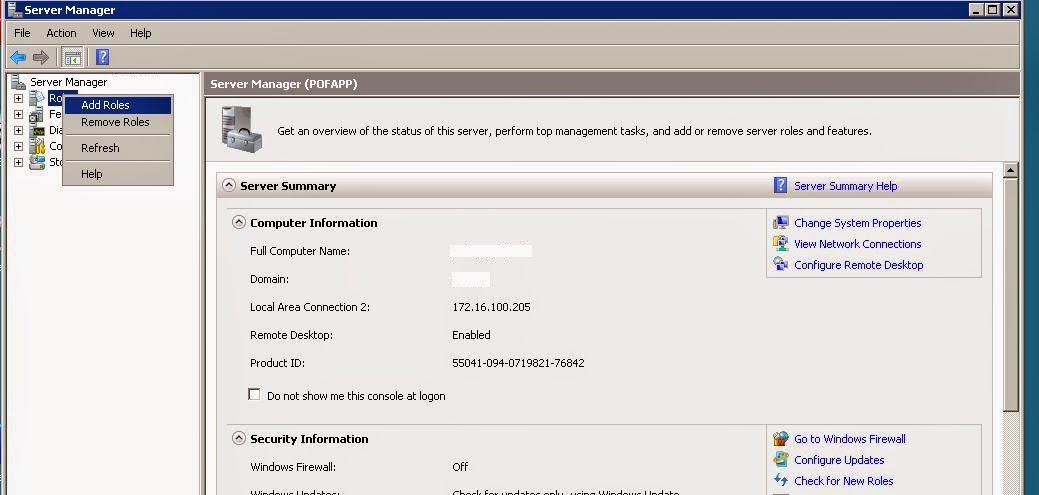
2. If IIS is not installed, start from below screenshot. Right click on Roles node & select
    "Add Roles".


3. Click Next .


4. Select Web Server (IIS) . I have already installed, so Installed is shown next.


5. Click Next to show Role Services List. Note, if IIS is already installed in server, 
    skip the above steps 2,3 & 4. In the step 1, expand Roles node. Right Click on 
    Web Server (IIS) , click Add Role Services to show Role Services List.


6. In Role Services List select FTP Server as shown below in screenshot. Finish the wizard by 
    clicking Next.


7. Select Internet Information Services (IIS) Manager node. Expand ServerName node 
    from Connections pane.


8. Click FTP Sites. Click Click here to launch from right side.


9. In the open dialog should see Default FTP Site. Expand the node if not visible.


10. Right click on Default FTP Site, New & click Virtual Directory like in below screenshot.


11. Click Next.


12. Enter a short Alias name for Virtual Directory. Click Next.


13. Click Browse & select path of Directory for mapping. I am mapping C:\ Drive. Click Next.


14. Assign permission for Virtual Directory. Click Next & Finish the wizard.


15. Virtual Directory should be listed under Default FTP Site.


16. Also check that FTP Service running normally by clicking Web Server (IIS) node.


17. In the browser, type ftp://IPAddressOfServer/CDrv & check that Directory are listed or not.


18. Now, after confirming that FTP site shows Directory Listing , we can also use FileZilla 
      FTP client to make connection. Open Site Manager in FileZilla.


19. Click New Site & enter details in  General tab like below.


20. Click Advanced tab & enter Alias Name (CDrv) in Default remote directory: like below.


21. Click Connect to see Directory listing from Server.


Monday, August 4, 2014

Configure History Columns In Entity Object In ADF

Oracle JDeveloper 11.1.2.3
ADF Business Component


By Default Entity Object creates 5 history column. We can include a new history attribute if required, in Entity Object creation. Open the below dialog from Tools > Preferences. 0 to 10 TypeID are reserved for internal use.


We can create a new History column TypeID starting from 11 to 127. Trying to create with Type Id=6 gives below error "The History Type Id....for internal use".


Sunday, July 13, 2014

JavaScript Does Not Execute Properly In Cluster WebLogicServer

Weblogic Server 10.3.6
BIGIP F5 Load Balancer
Oracle Linux 6
Oracle JDeveloper 11.1.2.3
IE 8 & FF 30

Recently, when I try to deploy an ADF Application in Production Weblogic 10.3.6 Cluster Environment,
got problem while loading a simple javascript function.

The release was an update to previous running application. In Javascript(.js) file I introduced a simple Javascript function.

It happened before too, whenever we deploy new release of ADF Application some Javascript function do not load.Either, we do UPDATE on existing application EAR file or completely remove and redeploy, js function do not load.

The strange thing is that, while testing locally in JDeveloper  IDE, function runs normally. We had already configured ADF Application for HA environment for Cluster Weblogic.

Please note that, while accessing application URL by LoadBalancer DNS Name, function was not loading
but by accessing Load Balancer IP Address it was working normally. Application URL was published by
Load Balancer DNS Name to the users.

The Weblogic Server configuration is -
Server 1 Machine
-----------------------
ProdAdminServer
Node Manager 1
Managed Server 1


Server 2 Machine
----------------------------
Node Manager 2
Managed Server 2


We examined HTTP traffic between Browser & Load Balancer and that was normal.
Next, some of analysis we have done (IE 8 & FF 30) -
1. When hitting by IP address of Load Balancer, script is working - http://IPAddress:7003/appname/faces/login
2. When hitting by LoadBalancer name, script is not working - http://LoadBalancerName:7003/appname/faces/login
3. When hitting to managed server 1 by  IP address, its working - http://ManageSrv1-IPAddress:7003/appname/faces/login
4. When hitting to managed server 2 by  IP address, working - http://ManageSrv2-IPAddress:7003/appname/faces/login

We found the solution in F5 Configuration console, where we found Web Acceleration Profile was set to caching. On setting Web Accelertion Profile=None, resolves the issue instantly.

Navigate to -
Local Traffic  >  Virtual Servers : Virtual Server List  >  VS_WEBLOGIC_http_virtual > Web Acceleration Profile.


Friday, June 13, 2014

Integrating ADF BI Publisher In JDeveloper 11g to Generate Report Programmatically.

Oracle JDeveloper 11.1.2.3
ADF Faces RC
Business Components
Oracle BI Publisher 10g
Oracle BI Publisher Desktop 10g

This post would explain how to Integrate BI Publisher with ADF Fusion Application to generate report programmatically. The overview of BI Publisher & BI Publisher Desktop is not discussed here.

Sample workspace is based on Oracle HR schema. BI Publisher Desktop is used for designing RTF template. This should present as menu in MS-Word after installation. However, designing of template is also not covered in this post. Please read the Oracle Official Document to create RTF Template based on XML Data.

BI Publisher JAR Files -
1. i18nAPI_v3
2. versioninfo
3. xdocore
4. xmlparserv2-904


The jars can get from BI Publisher Desktop installation directory.
The Location is - C:\Program Files\Oracle\BI Publisher\BI Publisher Desktop\TemplateViewer\lib
The jars are also included with Sample Workspace under /HrReport/jars folder.

The ViewObject rows will be converted to XML data. This XML data is then merged with RTF Template to generate XSL Template. Finally this XSL Template will return outputstream of data. This stream can be written to desired report output like PDF, HTML, EXCEL etc.

The ViewObject Query will return all the employees in particular Department based on parameter DeptID. The DeptID is Bind Variable parameter.


The HR.jspx page has inputText & Generate Report Button. The inputText is wired to Binding property to submit value in DeptID bind variable.

Please note that there is 2nd hidden button, which is actually doing the report generation process. The reason for using two button is to check some validation & then start process. Furthermore, af:fileDownloadActionListener always download a file irrespective of any valid or invalid input.
To avoid such situation, first button will check validation, if it passes, queqe an action event to 2nd hidden button.


Since, actual process will take place in HrAMImpl.java class, so jars should be present in Model Project.
Add all the jars as Library in Model Project. The advantage of adding as Library is that path references will resolve easily as far as if they exist in project source files. All jars are added as BIJars in Libraries & Classpath section of Model Project Properties.


To add the jars as Library, click Add Library then click New to open Create Library dialog.
Click Add Entry to add jar files. Press OK to close all dialogs.


The 2nd hidden button will invoke HrReport() method from HR managed bean. Which inturn invokes a method getHrReport() in HrAMImpl class.


The conversion of ViewObject rows to XML tag is done in getXMLDataHr() method. vo.writeXML() method is used for generating XML Nodes.
The XML Data can be printed in Log Window by uncommenting the line, the last one in method - System.out.println("final -" + finalXMLData).


If the Query does not return any row, then corrupted output will be generated of report. To avoid this, we have to return a blank XML output for template. This will generate a blank report output when ViewObject does not return any row.


Create a XML file anywhere in FileSystem. Copy-Paste generated XML Data in file & save as Employee.xml (in this case). A sample XML file is shipped with Sample Source.

Start BI Publisher Server (This step is required only when RTF is going to upload in Report Server.This is only applicable when report generation takes place from BI Server.This step can be skipped & start with MS-Word.When this step is skipped, there is no any need to make connection with BI Server from MS-Word).

Open MS-Word. Load Employee.xml file from BI Publisher menu Load XML Data & design the Layout of template. Save the template with HR.rtf (in this case). A HR.rtf is shipped with Sample Source. Visit Oracle site mentioned above to learn designing the template.


Finally, navigate to DefaultDomain directory in IntegratedWebLogicServer or ProdWeblogicServer.
In my Windows 7 the path is-C:\Users\Rashid\AppData\Roaming\JDeveloper\system11.1.2.3.39.62.76.1\DefaultDomain .
Create a directory ReportTemplates here & paste HR.rtf under it. And its done.


Sample can be downloaded from here. Sample includes Template file HR.rtf, a XML File Employee.xml for employee data. To run this sample, HR.rtf should placed under above mentioned WebLogic Server Directory Location.

Wednesday, June 11, 2014

<DataControlFrameImpl> <findFirstDCUsageInFrameScope> Data Control usage collision In ADF Application

Oracle JDeveloper - 11.1.2.3
ADF Faces RC
ADF Business Component

While using Taskflows from reusable ADF Library encountered below error -

<DataControlFrameImpl> <findFirstDCUsageInFrameScope> Data Control usage collision on ApplicationModuleDataControl between com.app.masterApp.view.DataBindings.cpx and com.app.childApp.chview.DataBindingsCHM.cpx

In above case, a master application is adding a child application via ADF Library JAR File. Creation of ADF Library JAR File & adding to project source files is not discussed in this post.

The ADF Library JAR File is created in child application like below.


The attached ADF Library JAR File in master application can be seen from project properties.
Select ADF Library & click Edit button to open Edit Library Definition dialog.This should show ADF Library JAR File being used in master application.


While trying to run the application above mentioned error throws in log window.

While adding ADF Library JAR file from resource palette, a duplicate entry is added in master application's DataBindings.cpx file. The entry was found under dataControlUsage section.

<BC4JDataControl id="ApplicationModuleDataControl" .../>

The same DataControl is already exposed by ADF Library JAR File in project source file.

Removed the above entry from master application's DataBindings.cpx. 
This solved the issue. Now, re-running the application did not show collision error.


Monday, November 4, 2013

Solved - Resource Bundle Variable Resolver Error while deploying ADF Application.

JDeveloper 11.1.2.3
Weblogic 10.3.6

While deploying EAR file of ADF Application in Prod Weblogic throws javax.variableresolver.class not found exception .

The solution is -
1. Open Model Project Properties dialog.
2. Remove Resource Bundle Variable Resolver library.