Friday, March 10, 2023

Oracle ADF to Stripe Payment Gateway Integration in JDeveloper Studio Edition Version 12.2.1.3.0.

Below is the Sample for Oracle ADF to Stripe Payment Gateway Integration in JDeveloper Studio Edition Version 12.2.1.3.0. The Sample is based on Invoice Payment Amount from JSPX Page to Redirecting to Pre-Built Checkout Page of Stripe.

There is no need to connect with Secure Connection(HTTPS) for Testing of Stripe Sandbox Environment.

Sign-Up to Developer Account in Stripe to get Secret Key for Sandbox Environment. This Key will be used in Sample to create Checkout Session. Minimum JARs required to Run the Sample and Sample Source Download Link is Provided in Video Link.

Stripe Documentation - 

https://stripe.com/docs/checkout/quickstart

https://stripe.com/docs/payments/accept-a-payment

Youtube Video Link - https://youtu.be/zhgQBducXc0


Wednesday, February 9, 2022

How to Create Multiple Virtual Server and Install Word-Press in QNAP QTS 5.0.0.1932

QNAP QTS 5.0.0.1932

A QNAP NAS can have Multiple Virtual Server running on same IP and Port. Different Port can also given. Open 'Web Server' from Control Panel. Your 'Web Server' must be enabled and running as shown below.


Click 'Virtual Host' tab and click 'Enable Virtual Host', then click 'Create a Virtual Host'.

Give the 'Host Name' as 'TestSite1' (No Quotes).

Select 'Root Directory' as your Install Folder. Create 'TestSite1' Folder manually in File System before choosing the folder in 'Root Directory'.

Choose 'Protocol' HTTP and 'Port Number' 80. Click 'APPLY'.


Unzip the Download. Copy all unzipped files and paste into 'TestSite1' Folder.


Create a different database for 'TestSite1' as TestSite1' if you want a separate database for each virtual server, otherwise skip this step.


Run the Word-Press URL in Browser - http://NAS-IP/TestSite1 to complete the Word-Press installation. Provide the Database Name, Root User Name, Root Password for Database, Host and Prefix etc. Finish the Installation and access login url by - http://NAS-IP/TestSite1/wp-login.php


Tuesday, February 8, 2022

WordPress Folder Not Visible in QNAP NAS QTS Version 5.0.0.1891

QNAP NAS QTS Version 5.0.0.1891 

Installation Folder for WordPress 5.8.2 does not appear after installation from App Center.
By Default WordPress Folder should appear under '\\DataVol\Web\WordPress'.
 

Remove the WordPress 5.8.2.
Then WordPress 4.9.5.0.1 can be used as an alternate solution. The Zip Version can be downloaded via WordPress older release (https://wordpress.org/wordpress-4.9.5.zip). Installing WordPress from Zip is little different than QNAP Link (https://download.qnap.com/QPKG/WordPress_4.9.5.0.1.zip) .

QNAP Link - https://www.qnap.com/en/app_center/  (You need to Provide Correct QTS Version 4.5.3~4.5.4 to get WordPress 4.9.5.0.1 QPKG)

I will continue here QPKG Download. Unzip the Zip file downloaded from QNAP.
Open 'Install Manually' from App Center. Locate your QPKG file and Click 'INSTALL'.
Once Installation done, check for the WordPress Folder under '\\DataVol\Web' in your NAS.

Manual


Wednesday, July 8, 2015

Warning : java.lang.IllegalArgumentException: .jsff is not a source file

Oracle JDeveloper 11.1.2.3

While running an application designed with TaskFlow & Page Fragments got below error

Warning: weblogic.utils.compiler.ToolFailureException: Unexpected exception while compiling jsps :java.lang.IllegalArgumentException: The file file:<Path>\page.jsff is not a source file
 
Solution - Add in web.xml file below lines to specifically recognize jsff page pattern.

<jsp-config>
    <jsp-property-group>
      <url-pattern>*.jsff</url-pattern>
      <is-xml>true</is-xml>
    </jsp-property-group>

</jsp-config>


Refer - https://blogs.oracle.com/jdevotnharvest/entry/warning_java_lang_illegalargumentexception_the

oracle.jbo.PersistenceException: JBO-34000: Definition class name missing in XML file of type task Flow

Oracle JDeveloper 11.1.2.3

While doing some copying of Project Source File Content into New Application Source, upon running the page found below error -

oracle.jbo.PersistenceException: JBO-34000: Definition class name missing in XML file of type task Flow

I was copying the content from DataBindings.cpx into new DataBindings.cpx file for a new application & missed to include <definitionFactories/> .

Solution - Open DataBinding.cpx file. Paste the below lines -
<definitionFactories>
        <factory nameSpace="http://xmlns.oracle.com/adf/controller/binding"
                 className="oracle.adf.controller.internal.binding.TaskFlowBindingDefFactoryImpl"/>
        <dtfactory className="oracle.adf.controller.internal.dtrt.binding.BindingDTObjectFactory"/>
        <factory nameSpace="http://xmlns.oracle.com/adfm/dvt"
                 className="oracle.adfinternal.view.faces.dvt.model.binding.FacesBindingFactory"/></definitionFactories>


This should resolve the issue.

Tuesday, July 7, 2015

How to Resolve JDeveloper IDE Corruption ?

Oracle JDeveloper 11.1.2.3
Windows 7

Recently while doing some work in JDeveloper noticed, Project Hierarchy in "Application Navigator" is overlapping down on "Application Resources" & "Data Control" Panel.

"Data Control" Panel is stuck and not expanding. Reason for these abnormalities is corruption of DefaultWorkSpace file in System Folder.


Solution - Navigate to C:\Users\it_rashid\AppData\Roaming\JDeveloper\system11.1.2.3.39.62.76.1,
Rename or Delete folder "o.jdeveloper". Restart JDeveloper if it is open. This should resolve the issue.

Monday, July 6, 2015

Null Pointer While Creating New Application In JDeveloper 11g

Oracle JDeveloper 11.1.2.3
Windows 7

While trying to create a new "Fusion Web Application" from New Gallery Dialog, get the below Exception in a dialog & Wizard was not opening -

java.lang.NullPointerException at oracle.jdeveloper.model.ApplicationContent.getInstance(ApplicationContent.java:67)


Solution - Navigate to System Folder C:\Users\it_rashid\AppData\Roaming\JDeveloper\system11.1.2.3.39.62.76.1, Rename or Delete "o.ide" folder. Close & Re-Open JDeveloper if it is open. This should resolve the issue.

Sunday, June 28, 2015

How to Change Memory Usage of Integrated Web Logic Server ?

Oracle JDeveloper 11.1.2.3
Web Logic Server Integrated 10.3.5.0


Wednesday, June 24, 2015

How to change the Memory Usage of JDeveloper 11g ?


Oracle JDeveloper 11.1.2.3
Windows 7


Saturday, October 11, 2014

Configure Wireless Adapter In Windows Server 2008 R2

Windows Server Enterprise 2008 R2 64
Sony VAIO S Series Laptop

After installing Windows Server OS in my laptop, I wanted to start Wireless Service.
But Sony VAIO does not provide drivers for my OS.

The easiest way to configure Wireless Adapter provided by the OS itself.

Navigate -
All Programs > Administrative Tools > Server Manager.
Follow the Screenshot. 


Click on Add Features to open the dialog. Scroll last in dialog. Tick Wireless LAN Service & click
Install to finish the setup.


Wednesday, August 27, 2014

Set MTU Size In LAN Network

Windows 2008 Server SP2 Standard
Windows XP Client SP3

The Default MTU size of different media can be seen here .
For LAN Ethernet Default is 1500.

To check MTU size from a client machine to LAN Server, execute following command in Command Prompt.

ping IPAddress -f -l MTUSize. (l is small L)

For Example -  ping 172.16.100.205 -f -l 1500

If Packet needs to be fragmented but DF set. shows in command prompt, you should set MTU size by lowering the packet size.


Repeat the above process by entering lower MTU size until you do not see Packet Fragmented message. Repeat same process by adding 1 in MTU like 1272+1 = 1273. If you see Packet Fragmented message, then 1272 is correct MTU & not 1273.


After determining correct MTU size for Server, log in to Server by Administrator Account.
In Command Prompt execute -

netsh interface ipv4 show interfaces


 Execute following command in cmd for setting MTU size -

netsh interface ipv4 set subinterface 11 mtu=1272 store=persistent


Monday, August 25, 2014

Enter Only Numeric In ADF InputText In JDeveloper 11g

Oracle JDeveloper 11.1.2.3
ADF Faces Rich Component

To enter only numbers/numeric value in ADF InputText,
<af:validateRegExp/> can be used from Operations node in Component Palette.

 <af:inputText value="#{bindings.EmployeeNo1.inputValue}" label="#{bindings.EmployeeNo1.hints.label}"  
                  required="#{bindings.EmployeeNo1.hints.mandatory}"  
                  columns="#{bindings.EmployeeNo1.hints.displayWidth}"  
                  maximumLength="#{bindings.EmployeeNo1.hints.precision}"  
                  shortDesc="#{bindings.EmployeeNo1.hints.tooltip}" id="it18"  
                  autoSubmit="true"  
                  valueChangeListener="#{backingBeanScope.book.employeeDetails}">  
             <f:validator binding="#{bindings.EmployeeNo1.validator}"/>  
   <af:validateRegExp pattern="[0-9]{1,10}" messageDetailNoMatch="Enter Only Numbers"/>  
 </af:inputText>  

Sunday, August 24, 2014

Dynamically Set Value In ADF InputText By Runtime JavaScript In JDeveloper 11g

Oracle JDeveloper 11.1.2.3
ADF Faces Rich Component
ADF Business Components

Sometime requirement is to set the value in Text Component by JavaScript.
We can set the value in Adf InputText dynamically by Server Side JavaScript.

Sample is based on Oracle HR Schema & can be downloaded from here.

In the sample, after pressing CreateInsert button a blank form is displayed for 
New Record Entry.


After entering a unique DepartmentId (25)DepartmentName field is automatically
populated with TestDept value.


Saturday, August 23, 2014

Publish Windows Server Drive To FTP Service To Access From FTP Client FileZilla Or Browser

Windows Server Standard 2008 SP2
FileZilla Client
IIS 6.0

Sometimes we need to access our Local/Intranet Server Drives by FTP Client for downloading or uploading files or folders. We can publish our Drives as Virtual Directory on FTP Service to access from FTP client or Browser.

FTP services in Windows do require IIS to be installed on the host machine before FTP can be installed and configured. 


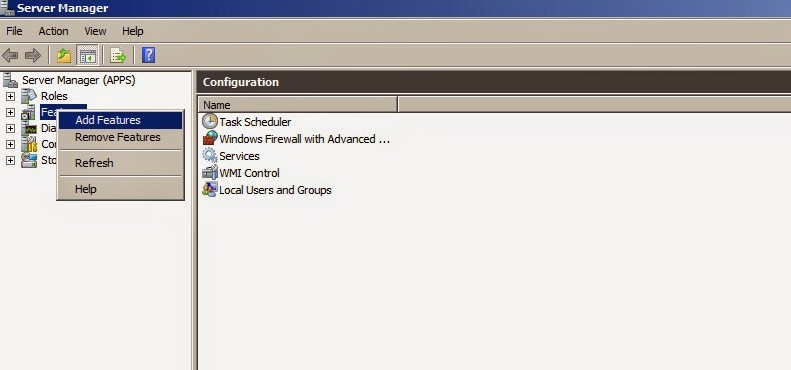
1. Click Start - Settings - Control Panel - Administrative Tools - Server Manager


2. If IIS is not installed, start from below screenshot. Right click on Roles node & select
    "Add Roles".


3. Click Next .


4. Select Web Server (IIS) . I have already installed, so Installed is shown next.


5. Click Next to show Role Services List. Note, if IIS is already installed in server, 
    skip the above steps 2,3 & 4. In the step 1, expand Roles node. Right Click on 
    Web Server (IIS) , click Add Role Services to show Role Services List.


6. In Role Services List select FTP Server as shown below in screenshot. Finish the wizard by 
    clicking Next.


7. Select Internet Information Services (IIS) Manager node. Expand ServerName node 
    from Connections pane.


8. Click FTP Sites. Click Click here to launch from right side.


9. In the open dialog should see Default FTP Site. Expand the node if not visible.


10. Right click on Default FTP Site, New & click Virtual Directory like in below screenshot.


11. Click Next.


12. Enter a short Alias name for Virtual Directory. Click Next.


13. Click Browse & select path of Directory for mapping. I am mapping C:\ Drive. Click Next.


14. Assign permission for Virtual Directory. Click Next & Finish the wizard.


15. Virtual Directory should be listed under Default FTP Site.


16. Also check that FTP Service running normally by clicking Web Server (IIS) node.


17. In the browser, type ftp://IPAddressOfServer/CDrv & check that Directory are listed or not.


18. Now, after confirming that FTP site shows Directory Listing , we can also use FileZilla 
      FTP client to make connection. Open Site Manager in FileZilla.


19. Click New Site & enter details in  General tab like below.


20. Click Advanced tab & enter Alias Name (CDrv) in Default remote directory: like below.


21. Click Connect to see Directory listing from Server.


Monday, August 4, 2014

Configure History Columns In Entity Object In ADF

Oracle JDeveloper 11.1.2.3
ADF Business Component


By Default Entity Object creates 5 history column. We can include a new history attribute if required, in Entity Object creation. Open the below dialog from Tools > Preferences. 0 to 10 TypeID are reserved for internal use.


We can create a new History column TypeID starting from 11 to 127. Trying to create with Type Id=6 gives below error "The History Type Id....for internal use".


Sunday, July 13, 2014

JavaScript Does Not Execute Properly In Cluster WebLogicServer

Weblogic Server 10.3.6
BIGIP F5 Load Balancer
Oracle Linux 6
Oracle JDeveloper 11.1.2.3
IE 8 & FF 30

Recently, when I try to deploy an ADF Application in Production Weblogic 10.3.6 Cluster Environment,
got problem while loading a simple javascript function.

The release was an update to previous running application. In Javascript(.js) file I introduced a simple Javascript function.

It happened before too, whenever we deploy new release of ADF Application some Javascript function do not load.Either, we do UPDATE on existing application EAR file or completely remove and redeploy, js function do not load.

The strange thing is that, while testing locally in JDeveloper  IDE, function runs normally. We had already configured ADF Application for HA environment for Cluster Weblogic.

Please note that, while accessing application URL by LoadBalancer DNS Name, function was not loading
but by accessing Load Balancer IP Address it was working normally. Application URL was published by
Load Balancer DNS Name to the users.

The Weblogic Server configuration is -
Server 1 Machine
-----------------------
ProdAdminServer
Node Manager 1
Managed Server 1


Server 2 Machine
----------------------------
Node Manager 2
Managed Server 2


We examined HTTP traffic between Browser & Load Balancer and that was normal.
Next, some of analysis we have done (IE 8 & FF 30) -
1. When hitting by IP address of Load Balancer, script is working - http://IPAddress:7003/appname/faces/login
2. When hitting by LoadBalancer name, script is not working - http://LoadBalancerName:7003/appname/faces/login
3. When hitting to managed server 1 by  IP address, its working - http://ManageSrv1-IPAddress:7003/appname/faces/login
4. When hitting to managed server 2 by  IP address, working - http://ManageSrv2-IPAddress:7003/appname/faces/login

We found the solution in F5 Configuration console, where we found Web Acceleration Profile was set to caching. On setting Web Accelertion Profile=None, resolves the issue instantly.

Navigate to -
Local Traffic  >  Virtual Servers : Virtual Server List  >  VS_WEBLOGIC_http_virtual > Web Acceleration Profile.